What belongs in a completed-work photo report?
Start with the job title, work date and the areas you worked on. Add customer or site details when they help identify the job. Your business name and contact details tell the reader who prepared the report. Keep personal details limited to what the recipient needs.
Then group photos by task or location. Give each group a short work description and captions that identify the visible details. End with any outstanding items or next steps. A signature can be useful if the job calls for one, but a photo report does not need a signature to explain the work.
- Job title and actual work date
- Relevant client/site information
- Work sections with selected photographs
- Short factual captions and observations
- Outstanding items or follow-up, where applicable
- Optional signatures and company details
Copy this simple photo report template
Use this outline in a document editor or as a starting point for work sections in a reporting app. Replace every bracketed item and remove fields you do not need. The example is a structure, not a record of a real job.
COMPLETED-WORK PHOTO REPORT

Job: [Short, specific title]
Work date: [Actual date of the visit/work]
Client/site: [Only the details needed to identify the job]
Prepared by: [Business or worker name and contact]

WORK SECTION: [Task or area]
Work carried out: [What you actually did]
Before photo: [Area shown and starting condition]
After photo: [Same area and visible change]
Detail photo: [Connection, finish or component shown]
Checks/observations: [Only observations or checks actually made]
Outstanding items: [Any unfinished work or follow-up]

Repeat the work section for a different task or area.

Summary: [Completed scope and agreed next steps]
Sign-off: [Optional; include only when appropriate]
Choose photos that answer the client's questions
Begin with a wide view so the reader can locate the work. Add a closer view of the relevant change. If you photographed the starting condition, put the matching before and after views together. Keep an extra detail only when it answers a different question.
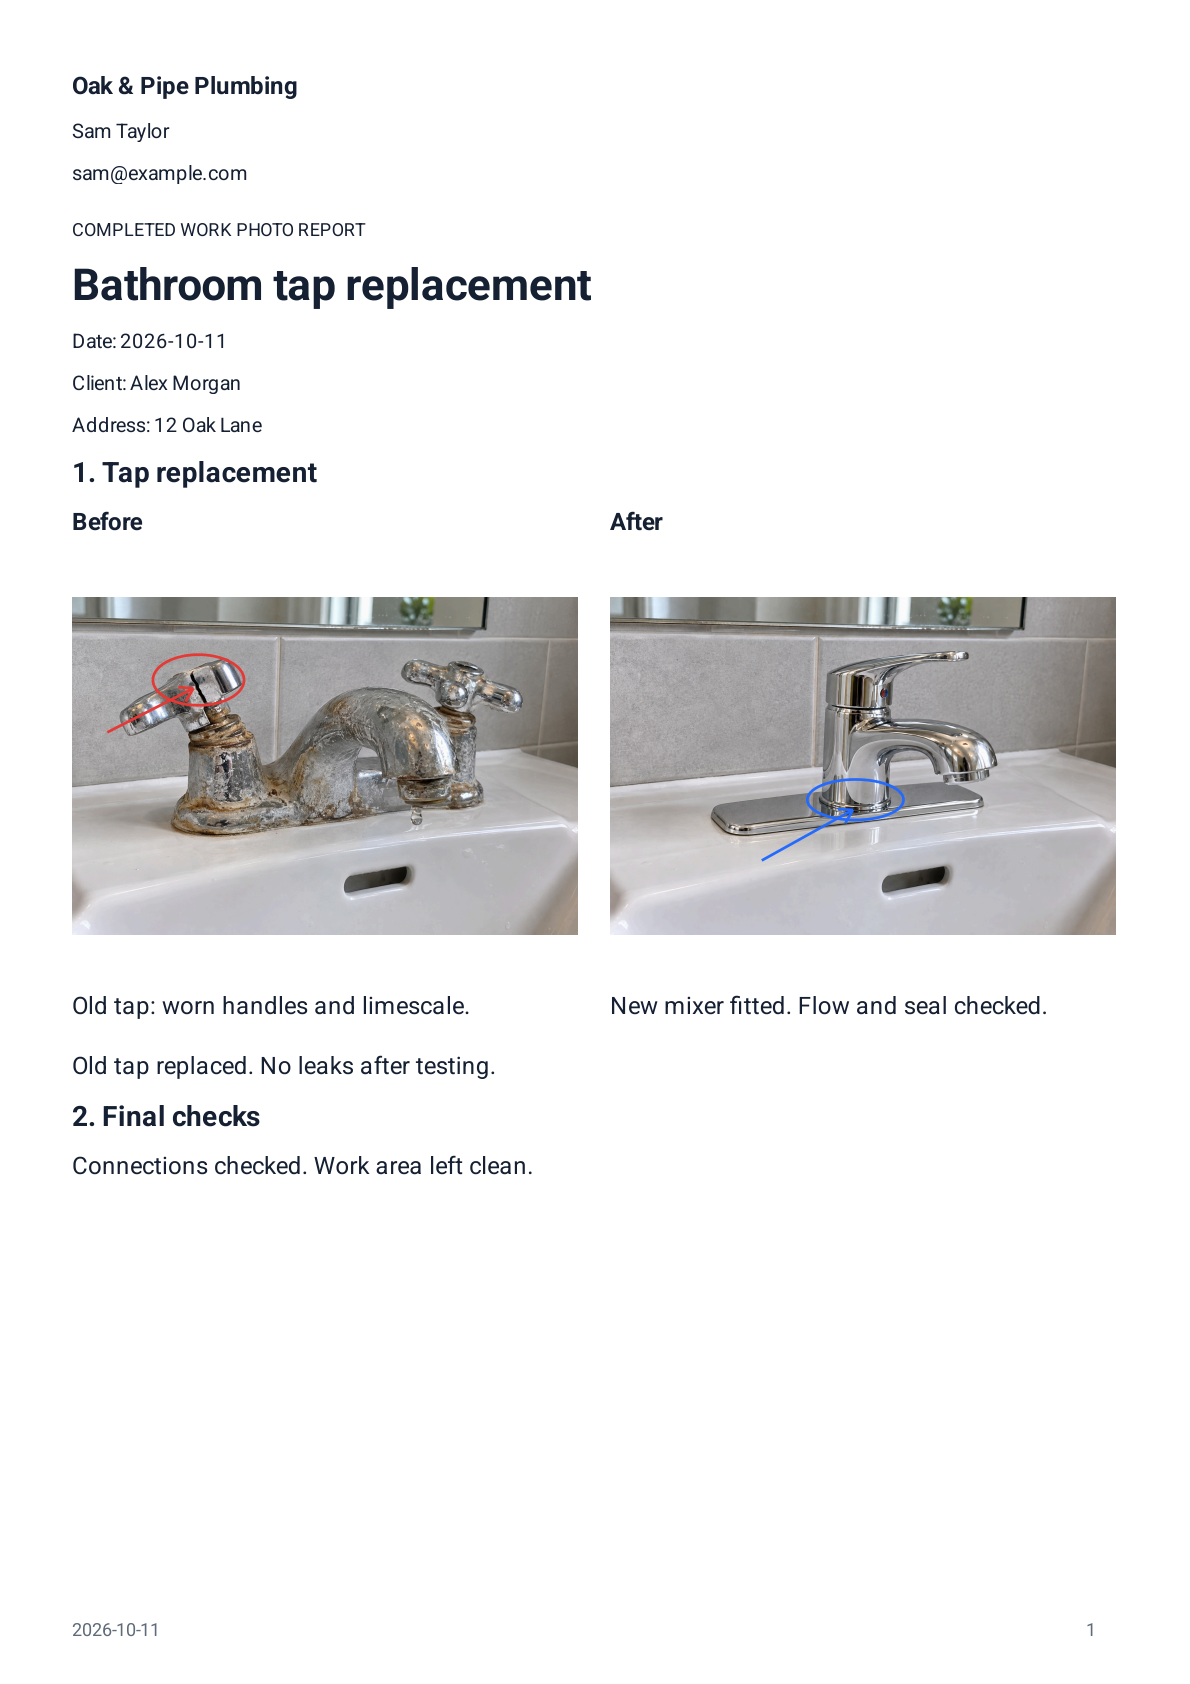
For a fictional bathroom tap replacement, a useful set might show the original tap, the installed replacement and a close-up of the connection. Ten nearly identical shots of the finished tap add less context than those three different views. If there was no before photo, explain the completed work using the photos you have; do not recreate an earlier condition.
Related guide: Before and After Repair Photos: A Field ChecklistWrite captions that identify the detail
A strong caption names the location, describes the visible change and adds a relevant observation. Keep the wording short enough to read beside the photograph.
For example: “Bathroom basin — replacement mixer tap installed; close-up shows the new connection.” If you actually checked for leaks, record what you observed and when. Do not add a check result just because it sounds reassuring.
An arrow or circle can direct attention to a seal or finish. Keep it clear of the detail it identifies. Markup should explain the image rather than cover it.
- Weak caption
- Fixed.
- Better caption
- Bathroom basin — replacement mixer tap installed.
- Weak caption
- All good.
- Better caption
- Cabinet hinge — hinge replaced; door alignment shown in the final view.
Make the PDF easy to read
Organize sections in the order the client will recognize: by room, asset or task. Use a consistent before/after sequence. Choose fewer photos per page when a detail needs to be read closely; a denser layout can work for overview images.
Preview every page. Check that full captions are visible, photos are not unintentionally cropped, and client or company information is correct. Open the exported file once before sending it. The actual Reportago demonstration PDF shows how a small repair can fit into a clear two-page document.
View sample PDFKeep the version you actually share
Keep a copy of the exported PDF alongside the job record. If you edit the report later, create a new version so you can tell which document you sent.
Treat sharing and delivery as separate facts. A saved PDF or opened share menu does not tell you that the client received or read the report. Use the confirmation available in the channel you chose, and record it separately if you need it. Back up editable reports as well as keeping final PDFs.
Use the outline in Reportago
On Android, Reportago lets you collect photos in work sections, add captions and annotations, pair before/after images, and generate a PDF. Saved work templates can carry the section structure and reusable text into the next job without the previous client's details or photographs.
Report editing works locally without a Reportago account. Optional client and worker signatures can be included in the report; they are handwritten additions rather than certified digital signatures. The app is currently awaiting its Android release, and you can inspect the real sample PDF now.
Frequently asked questions
Is a photo report the same as an invoice?
No. A photo report explains work with images and notes. An invoice records a charge. Keep each document appropriate to its own purpose.
How many photos should I include?
There is no fixed number. Include enough to identify the area, show the relevant change and explain a detail. Remove repeated images that add no information.
Can I reuse a report from the last customer?
Reuse the structure and standard text, but start with fresh job details and photos. Check that no previous customer's name, address or signature remains.